
Photo Gallery,
Part 2
 |
PG2, #1a
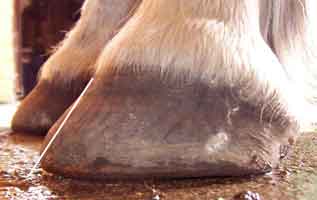
A foot with stretched white line (flare) around the toe. Note the "corners" in the wall on each side of the toe. These will cause a toe crack if they are not removed. My line at the edge of the sole shows how far we would round-in (not cut off), to help the white line tighten up as the hoof wall grows. |
 |
PG2, #1b
When the wall is rounded-in to my line shown above, the toe will look like this. |
 |
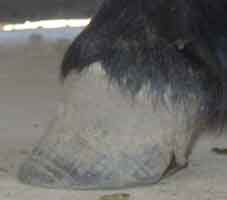
PG2, #2a
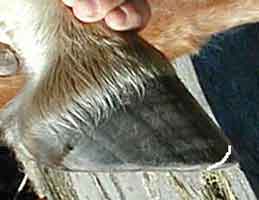
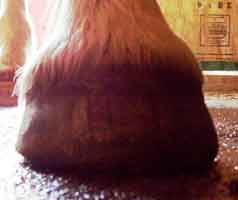
Here is a front foot whose toe angle looks straight; but look at the suspicious shape above the coronet, where the P2-P3 joint bulges forward (showing it's flexed downward a little), and the change in wall angle just below the hairline. I will guess that this is a mechanical founder, and that most of the toe wall is separated from the coffin bone. |
 |
PG2, #2b
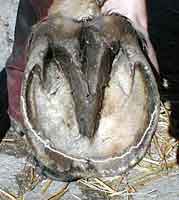
On the sole view, note the thin, curled-in heels and the toe extremely long-in-front; the sole and even the frog are pulled far forward of where they should be. There is a lot of stretched white line hidden under the splayed-out sole. If we watch the horse walk, this foot will land toe-first, and may even trip over itself sometimes. |
 |
PG2, #2c
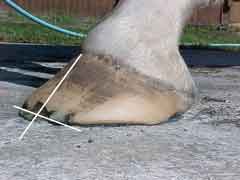
I've put a line where the toe angle should be, in relation to the actual position of the coffin bone. However, we will not rasp off such an extensive flare. Instead we will rocker the toe underneath, indicated by the lower line; this will help the toe "back up" to a position closer to the coffin bone (by allowing the foot to break over earlier and land heel-first). |
 |
PG2, #2d
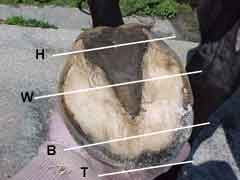
H = heels
In addition to rockering the toe, we will mustang roll to the edge of the (stretched) sole to help the white line tighten up. Over several months, the proportions of the foot will change until there is more foot from widest part to heel, and less foot from breakover to widest part; and the heels will spread apart. |
 |
PG2, #3
A typical "navicular" foot with the toe long-out-in-front and heels grown forward. Note the contracted heel (the back of the frog is narrow), stretched white line along the quarters, and frog pulled forward beyond its true position. The foot has already been given a breakover about where I have drawn it (looks too close to frog, but frog is too long), and the quarters have been rolled where the white line is separated (brown with dirt). I would expect substantial improvement from this trim, and would continue to back up the toe by renewing the toe rocker every week or two. The heels will likely spread apart within a couple of months as the toe backs up and the foot starts to land heel-first; the outline will end up nearly a circle, centered around the "widest part" line. |
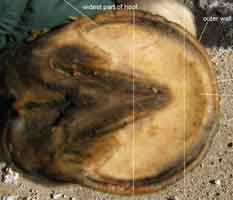 |
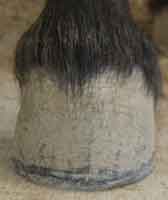
PG2, #4
This is a well-trimmed foot that has been barefoot for a while, showing the toe callus, with excellent concavity behind it. You can see how the bars naturally grow at a slant, like the rest of the hoof wall; these are normal bars, not "laid-over." These bars have worn till they are just longer than the sole; you wouldn't need to trim them. The only thing I would change, would be to mustang roll along the quarters where the white line is stretched (dark from dirt). |
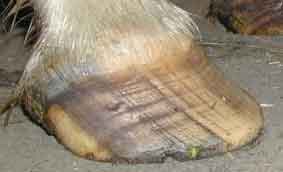 |
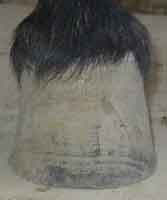
PG2, #5
This is maybe the 2nd trim after removing shoes; you can still see the nail holes along the bottom of the wall. Note that the toe is flared beginning more than halfway up, and you can see where the wall is well connected to the coffin bone in the area just below the hairline. The deep horizontal lines around the foot typically show changes in a horse's feed, or possibly the intervals when he was re-shod. Rather than rasp off such a big flare on the outside, which would weaken the wall, I would "back up" the toe using the toe rocker, and then round in the sharp edge. Later, when the flare has grown closer to the ground, I would rasp the last bit of it to make the wall straight. |
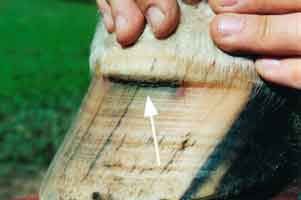 |
PG2, #6
Arrow points to where an abscess broke through at the coronet. The crease or gap will grow down along with the rest of the wall; it will cause no harm to the horse. |
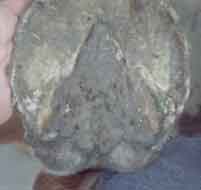 |
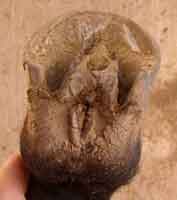
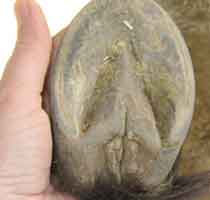
PG2, # 8
Here is a wide, happy frog on a lovely, round hoof. (Compare with #3 above.) This horse lives in a dry climate and probably wears its feet enough that only minimal trimming is needed. I would only mustang-roll the wall, and possibly trim the bar to the right, slightly. |
 |
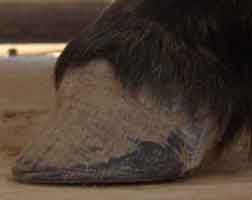
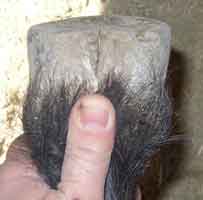
PG2, #11a
Here is a hind foot with a very long toe; you can see that it has grown a lot longer than the sole. |
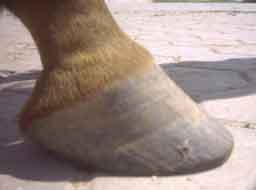 |
PG2, #11b
Side view confirms that the toe is long, and is beginning to pull the heels forward ("underslung"). After shortening the wall to the level of the sole, I would keep the toe snubbed (heavily mustang-rolled) for a while, to help it wear faster, till the foot gets back into a better shape. |
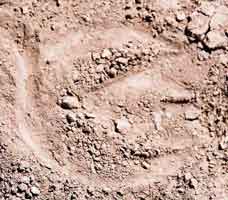 |
PG2, #12
Footprint of a round, happy foot with wide frog and heels. This lucky horse lives on dry terrain and his healthy foot shows it. |
 |
 |
PG2, # 13 a & b
Here is a pony's very overgrown front foot, before and after a trim. What looks like a long heel (after trim) is in fact just right on a pony; the heel height is about the same on every size of foot, from pony to draft horse. You can see some toe flare on both photos. I would use a toe rocker for several trims, to "back up" the toe. After that, given the shape of a pony foot, it's probably not needed for correct breakover. |
 |
 |
PG2, # 13 c & d
Front view, before and after trim. There is also some flare at the quarter on the left side. Nice mustang roll for a small foot; it's hard to roll a pony foot because the wall, while tough, is very thin. |
 |
 |
PG2, #13 e & f
In this view, you can see both the extent of overgrowth and the height of the trimmed heel. |
 |
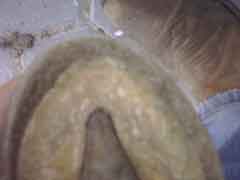
 |
PG2, #13 g & h
The owner has scraped away a lot of overgrown sole and removed some overgrown frog. We can see that in fact the wall has been shortened to the "live" or hard sole (it shows dark around the edge where it was rasped slightly), and that the trimmed heel is at the correct length, in relation to the sole. |
 |
PG2, #14a
A draft horse whose feet had gotten overgrown, after a good trim. Line follows the growth at the top of the hoof; remaining flare shows in front of the line . The owner has left some wall thickness there, for stability, and has used a strong mustang roll to get the flare off the ground, all the way around the foot. Excellent job. |
 |
PG2, #14b
Front view, showing some remaining flare at the quarters, and the strong mustang roll. |
 |
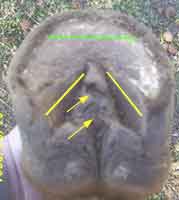
PG2, #14c
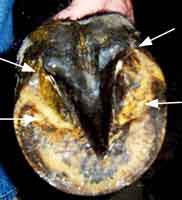
Note the wide, strong frog; the trimmed toe is not stretched forward of its correct position (see #1, #2, and #3 above for comparison) Upper arrows show the heel at the left is longer (farther forward than right heel). I would try to balance the heels, but only if I could do it without rasping into sole. Lower arrows show some lumps of sole beside the bars; I would probably trim these to match the rest of the sole. The white line is very stretched along the quarters; owner has already mustang rolled to the edge of the sole, and the wall will start to grow down straight with a good laminar attachment. |
 |
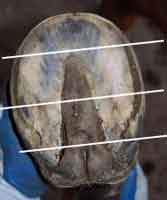
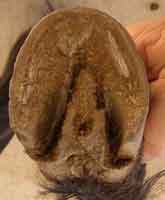
PG2, #15
Looking across the heels of a contracted foot. The side walls are slightly inside-the-vertical. The footprint should be at least as wide as the coronet; ideally the walls would slope outwards from the coronet to the ground. This is about the most difficult kind of foot to rehabilitate. I would like to hear from readers who are using the toe rocker (see Trim page) on a foot like this, whether it helps the heels to spread apart. |
 |
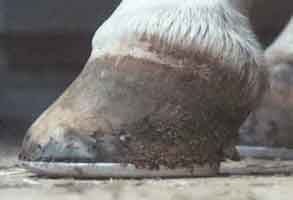
PG2, #16a
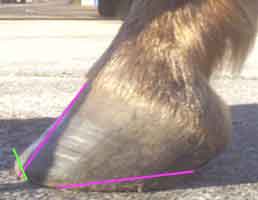
A typical hoof, showing a slight mechanical flare at the toe, due in part to the long heel. Green line indicates that we will back up the toe, rather than rasping off all the flare on the outer wall. |
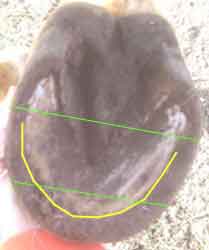 |
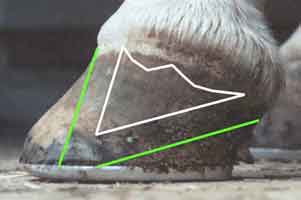
PG2, #16b
Yellow line at the edge of the sole. Mustang roll all the way to this line, until the white line has tightened up, to prevent the wall from continuing to flare as it grows. Green lines: center line at the widest part of the foot. Line near the toe shows where we will move the breakover closer to the frog with a toe rocker. |
 |
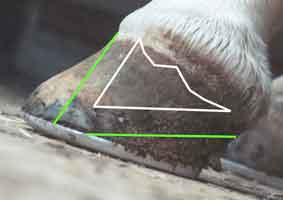
PG2, #16c
Yellow curve shows the wall can be shortened to the level of the sole. Pink arrow shows a "high spot" in the wall length, just for your practice in seeing high spots. Note that the side walls are nearly vertical. They will slant outward at the bottom as the heels spread apart (see #16d). |
 |
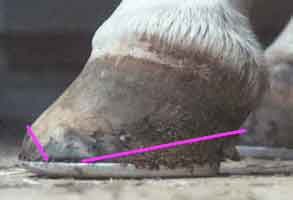
PG2, #16d
Yellow lines show about where the bars will need to be trimmed to, after shortening the walls to the edge of the sole. Arrows point at "shedding" frog which is actually a fungus infection. After several soaks with laundry borax, the frog will quickly grow in plumper, and will push the heels farther apart; the heels might spread 1/2 to 3/4 inch (13 - 20 mm) within a month or two. Green breakover line; rockering the toe from here forward will help the heels to spread wider apart. |
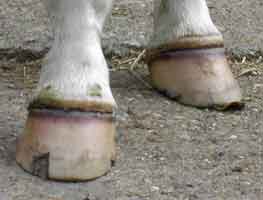 |
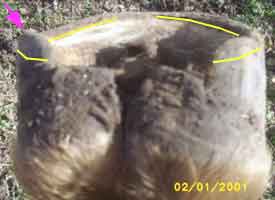
PG2, #17
A pair of hind feet, both long in the toe and especially at the outside toe (10 o'clock on one foot, 2 o'clock on the other). When this is balanced, the horse will not have to toe-out this much. Note chip in one toe where the hoof is trying to self-trim. Photo was sent to me to ask about the strange loss of hair on the coronet and purple color of the new wall growth. I believe it is a sort of "road founder"; the horse lives on soft pasture and I think had been suddenly worked on harder terrain. It is also possible there is a deficiency of a necessary mineral in the horse's diet. (May 18, 2007) Someone wrote to tell me she saw similar purple rings in the hooves of a yearling that came to her farm with a heavy parasite load. "We had a sudden and intense parasite explosion due to weather conditions, the short grass, lack of pasture rotation and the carrier filly. The stress of that parasite explosion made the yearlings very weak (unfortunately we lost the carrier filly before realizing what the problem was.. it was initially misdiagnosed as plant poisoning) and they got those purple rings on their hooves. They grew out without consequence." |
 |
PG2, #18a
A chronically foundered (over a year) foot with an eggbar shoe. The farrier has backed up the toe somewhat, but it is nowhere near the coffin bone yet. |
 |
PG2, #18b
White shape shows approximate position of the coffin bone. Green lines show where the new-growth toe angle and the bottom of the foot will be after rehabilitation. We will "build a new foot" around the present position of the coffin bone.
|
 |
PG2, #18c
Photo is rotated to help you "see" the foot after rehabilitation. In this position it is more obvious how much flared toe and excess heel length there are. Note that rotation of the coffin bone makes the old toe wall "long-in-front." This, along with the typical overgrown heel, prevents heel-first landing; thus a chronically foundered foot will also develop navicular-type pain over time. |
 |
PG2, #18d
Here is what we can do with this foot in the "first trim." The toe will be backed up to the green toe line (#18c) and the heel will be shortened somewhat. How much we shorten the heel will depend on the level of the sole in the seat of corn, after all chalky material has been scraped out. Note that the wedge of shortened heel does not reach all the way to the backed-up toe, in case there is penetration of the coffin bone. In effect, this leaves a toe rocker, which will help the foot to break over earlier. |
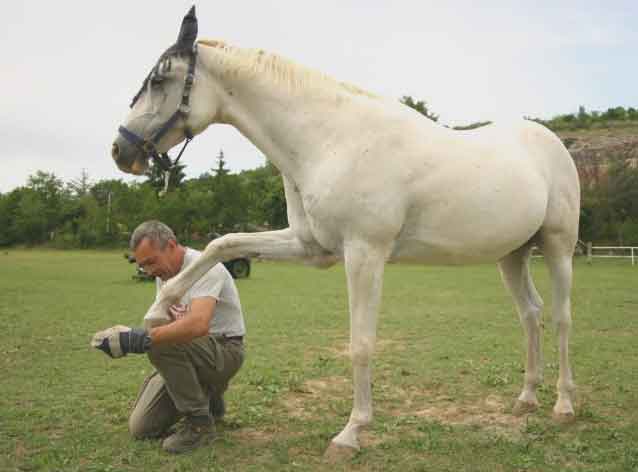 |
PG2, #19
Here is Alessandro Brollo, a barefooter in Italy, showing that a horse can make his own decision to work with us. Alex had trimmed this horse only once before. The "natural horsemanship conversation" (in the pasture with 17 other horses) went like this: "Hi, Zar. Do you remember me? We are friends."
|