
A chronic founder
The lines in this set of photos are approximate. My intention is to show you an idea, not that a foot would be trimmed precisely as I have drawn the lines.
A pony's owner wrote to me from Australia: “I hope you may be able to give me some advice on my pony’s feet. They have been trimmed by a farrier every 6 to 8 weeks for the two years that I have owned her; they were already very bad when I got her.”
Looking at the photos, it was clear that the pony has been chronically foundered, that no-one had recognized this, and therefore nothing was done to rehabilitate her feet. Ponies weigh so much less than horses that they may have less pain and sometimes don’t go into the typical “founder stance” with the front feet placed far forward. This pony was moving around without the extreme pain that we would expect from the photos. Many ponies have feet that look something like this, through neglect or infrequent trimming, or because neither owners nor farriers recognize that they are foundered.
I marked the photos, showing what she could do to begin rehabilitating the feet. As she is completely new to hoof trimming, she was cautious about doing too much in the beginning. She sent more photos after her first trim, and again I marked to show what she could do next.
I will use these photos to point out some major clues to chronic
founder. I will show how we can trim a foundered hoof to make it immediately
more comfortable and to get it started on the road to complete rehabilitation.
I hope that seeing all the photos together will give you a more 3-dimensional
understanding of what is going on in a foundered hoof.
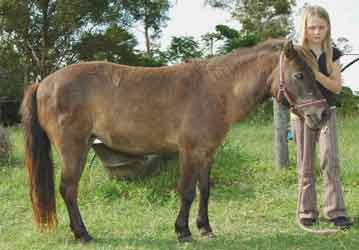 |
Here is the pony with the owner's 9-year-old stepdaughter. She is a small pony. This was taken recently, after 4 months of rehabilitation trimming. |
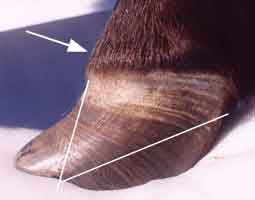 |
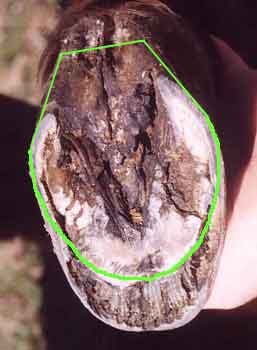
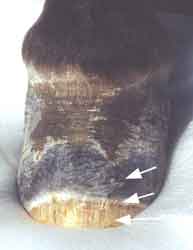
This pony was chronically foundered. All four feet looked about
like this. No-one knew how to trim the feet when she first foundered. Several
people tried to fix the outside of the foot, without understanding
what was going on inside.
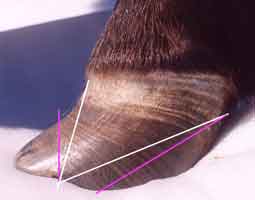
The toe is extremely flared forward, and the heel has grown faster than the toe. Notice that the growth lines are shorter in the toe, due to the toe wall pushing up into the coronet, which prevents wall growth. Arrow points to a characteristic "founder bulge" just above the hairline. The bulge is where the P2-P3 joint is flexed, due to rotation of the coffin bone. An x-ray (of a different horse) on the Founder page shows the flexed position of the joint. The toe-line shows where the toe wall will be when the pony has grown a "new foot" around the present rotated position of the coffin bone. We can "see" the direction of the new toe line by following the direction of the wall just below the coronet. The excess wall in front of the toe-line is a flare (e.g. it has pulled away from the coffin bone and the white line is separated), and is treated as a flare when you trim. The ground-line or base shows where the bottom of the foot will be when we trim the heels to put the coffin bone in a level ("ground-parallel") position. We will NOT actually trim the foot to either of these lines. They are for understanding only. |
 |
I have added a sketch of the coffin bone in its present, rotated
position. This gives a better idea of how we can build a "new foot" around
the bone.
The standard veterinary treatment is to use special shoes to try to push the bone back to its former position -- which cannot be done, once the white line has separated. The laminae cannot re-attach themselves. |
 |
The same photo, tilted so the ground line is horizontal. You can see where the "new foot" will be, about 8 months from now. |
 |
The pink lines show what we will actually
do.
We need to leave as much toe wall as possible, for overall strength of the hoof capsule, and for protection of the coffin bone. So, instead of removing all the flare that sticks out in front of the line, we will make a vertical cut to back up the toe. This increases the pony's comfort dramatically, without compromising wall strength. We need to shorten the heels and make a new base for the foot, yet we need to leave sole protection in the toe area, where the toe of the coffin bone has rotated down onto the sole and might penetrate. So we will shorten the heels but not shorten the toe on the bottom. We will trim the heel as far as possible -- to the level of the sole in the seat-of-corn. The new base will taper off and end a little behind the point-of-frog. (See drawing on Founder page.) |
 |
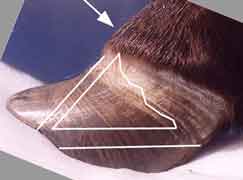
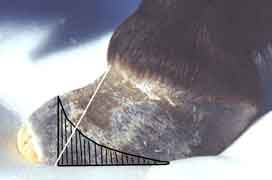
On the right foot, I have drawn again where the "new foot" will
be. I have also drawn the present rotated position of the coffin bone.
You can learn to "see" where a rotated coffin bone is, and thus how to trim a foundered foot. The toe-line continues down in the same direction as the new wall growth just below the hairline. The base-line starts where the toe-line meets the ground, and ends at the shortened heel. Note that the correct heel length on a pony "seems" longer than in a full-sized horse -- it makes the foot look more upright. A pony's coffin bone is as tall as a horse's, but is not as wide. So the heel length is about the same as a horse's heel. |
 |
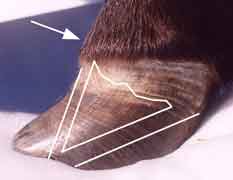
A view of the heel. We can see how extremely overgrown the heel
is. There is a lot of excess heel, bar, and frog material to remove.
Arrow points to the crease where the heels have been contracted by the leverage of the toe flare. Once we back up the toe, the heels will be able to widen as the foot re-builds itself. Line shows approximately how much the heels need to be shortened. Note the vertical side walls; they have been pulled together by the leverage of the long-in-front toe. See Photo Gallery #20 for a sound, cone-shaped pony foot. |
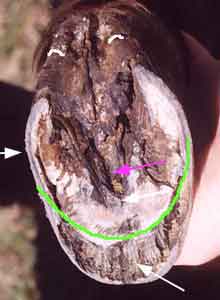 |
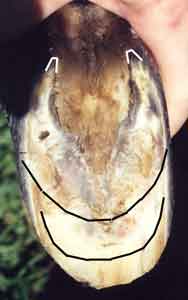
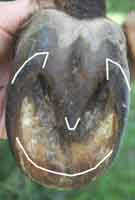
Sole view, with some landmarks.
Pink arrow shows the present point-of-frog, which has grown forward along with the rest of the toe. If we carefully trim back the forward-grown frog, the actual junction of the frog and sole will be about at the pink arrow. You will come to a spot where grayish frog material meets sole material (ivory or dark gray). This gives a better indication of where the entire base of the foot needs to be. White marks at heels show about how much the heels need to be shortened. The actual heel length will be determined by the level of the sole in the seat of corn, after all chalky overgrown material has been scraped off. White arrow at side shows how far back along the quarters the white line (laminae) has separated; you can see a dirty crack between the wall and the sole. White arrow at toe points to a very wide, dark expanse of stretched laminae (white line). This material feels "punky" like rotten wood. It is dead, there is no feeling in it; therefore we can cut through it without hurting the horse at all. Green curve shows where the outline of the foot will be after we remove the toe flare with a vertical cut, using rasp or nippers. Pony will be dramatically more comfortable as soon as this is done. It is the first thing we do on a foundered horse; even the heels can wait till the next day, if the horse is too tired to continue. |
 |
I have sketched the "new" outline of the foot, after the toe is
backed-up and the heels are shortened.
This is a temporary outline; it will change over the next few trims as the foot re-shapes itself internally. The heels will widen as the toe flare is backed up. It will become possible to remove even more toe flare. |
 |
To help you "see" where we are going, I have sketched the present
outline of the foot in yellow, as well as the green "new foot." Note that
the yellow outline is oval, and the green outline is more nearly round.
Even the green outline is somewhat oval, and will need its toe gradually
backed up. A year from now we would expect to have a round foot.
Note also how far forward the yellow outline is, in relation to the leg. It is very difficult to stand securely on a base that is so far forward. |
Here are photos after the owner's "first trim." She is new to trimming
and was very cautious, not wanting to hurt the pony by doing too much.
 |
The owner has done a very good job of shortening the heels and giving
the pony a new base (flat surface to stand on); this will make standing
much easier for her.
The heels are shortened until the rasp begins to touch the sole in the seat of corn, after scraping away any chalky exfoliating sole in the heel area. This gives the coffin bone a level (“ground-parallel”) position. White marks show where I think the heels could possibly be shortened a little more (judging by the side view). I have drawn two curved lines. The one nearest the toe is the present edge of the sole. The owner has backed up the toe a little, but there is plenty more flare for her to remove. This line at the edge of the pulled-forward sole is a reasonable first landmark for someone who is being cautious. The inner curved line shows about where the hoof wall will end up after rehabilitation – a fairly round outline. Probably it will be even rounder as the foot re-shapes itself. A big point that I want to get across is that all toe that is
beyond this rounder hoof shape will continue to cause flaring of the
new wall growth as it grows down from the coronet. (It is also painful
for the horse -- a flare is like having your fingernail pulled off.) We
don’t want to take months and months removing the toe flare, because those
months are lost time as far as growing a “new foot.” Whenever the toe
extends beyond this line, the new growth will flare again and will not
have a tight white line connection.
|
 |
The owner has done a good job of shortening the heel and giving
the foot a flat bottom surface (base) that’s easy to stand on. She has
also backed up the toe a little.
The new base makes it more obvious how much the toe has flared (e.g. how much the coffin bone is rotated). I have drawn in white, the direction of new growth in the toe wall. I hope this line helps you to picture the hoof as it will be after rehabilitation. In black I drew where we can make a vertical cut to where the toe
line reaches the ground. The hatching shows the vertical cut rounded in
as far as the quarters. Everything in front of the vertical cut should
be removed. When it’s gone the pony will be a lot more comfortable.
|
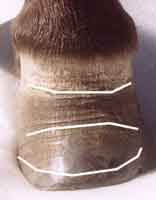 |
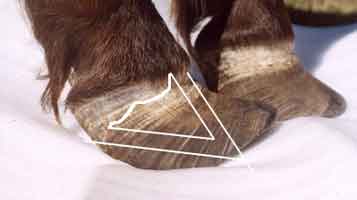
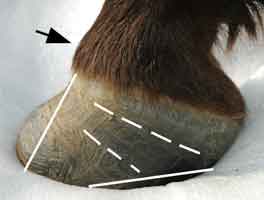
This is a front view of the hoof before the first trim. Notice how
vertical the side walls are. See Photo Gallery #20c for a healthy, cone-shaped
pony foot.
The two upper lines follow the growth rings in the toe wall. You can see how much the growth is compressed at the front. The lowest line is about where the owner trimmed off some flare in
her first trim.
|
 |
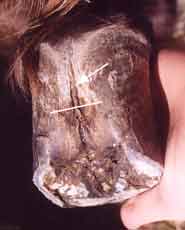
Front view after the first trim. The arrows point to some landmarks.
Top arrow, the outer hoof wall. Middle arrow, the white inner layer of hoof wall called the “water line.” This layer is very tough and takes concussion well; it is what the horse “walks on” when the outer wall is worn or trimmed away in a “mustang roll.” (See photos of mustang feet on Hoof Shape page.) Bottom arrow, the yellowish “white line.” You can see the stripey
laminae. It’s very wide because it has been stretched a lot as the hoof
wall flared away from the coffin bone.
|
Here are photos about four months later, after eight 2-week trims.
 |
The toe is much less flared. There is a good white line connection
partway down the toe wall. Following the new toe angle, we can see that
there is still some toe flare, which continues to push the wall upwards
into the coronet. This slows growth of the toe; the dashed lines along
some of the growth rings show that the toe is still growing slower than
the heel.
Although a pony foot will look longer-heeled than a horse foot, it looks to me like the heel can be shortened a little more (base line). It’s important to keep up with the faster heel growth. If you let the heel get long, you have a "club foot" situation which will make the toe wall flare even more. The black arrow points at the “founder bulge” in the P2-P3 joint.
It is less now than in the beginning, but reminds us that the coffin bone
is still rotated somewhat.
|
 |
On the sole view we see the same dramatic improvement. The toe is
much closer to where it needs to be.
I marked where I think the point-of-frog will be if the owner trims off a flap of excess frog growth. The spot where frog material and sole material join is an important guide for looking at the proportions of a hoof. I marked the heels to show that they can be shortened a little. Note that the frog has widened somewhat and it has a central cleft now. The curved line shows about where the toe flare can be removed. This will take wall pressure off the coronet so that the toe can grow down faster and without re-flaring. The dark brownish-yellow material in front of the toe curve is stretched
white line. We expect to see it here because in the side view we saw that
the lower part of the wall is flared.
|
The pony's owner is doing an excellent job in rehabilitating these feet. She reports the pony is moving a lot better. I would expect that in 6 more months the feet will be in excellent condition.
I hope that now you can
- recognize a chronically foundered foot
- “see” the rotated position of the coffin bone inside a deformed hoof
- understand how to trim a foundered hoof, to completely rehabilitate it.
If he is not able to pick up his feet, trim on soft ground and rasp right down into the ground. With the increased comfort, he may be able to pick up his feet briefly so you can trim the heels. If not, you can do the heels the next day.
For a horse or a larger pony, you should make pads for his comfort
for the first 2 or 3 days. (See Founder page.)