
Please look at the Tools page before you buy tools and before you trim. Especially if you are a woman and not familiar with using hand tools, I have put information that will help you.
There are many excellent photos of hoof trimming and the use of tools on www.ironfreehoof.com
In the beginning, aim to do only two feet per work session -- both fronts or both hinds in one day. Go back and forth between these two feet, so that if you have to stop for some reason, the feet are not left too different from each other. It took me about a year, trimming two horses every 3-4 weeks, before I was strong enough to do four feet; I didn't even try till I could do two feet in 45 minutes. It's perfectly OK to take several days to do a trim if you make sure the feet are comfortable for the horse at the end of each work session.
Quit when you're ahead. We all get frustrated when we're tired, and that's hard on the horse. You will be slow in the beginning, and that's a lot for the horse, too. To get his cooperation in your trimming program, you need to always leave the horse with the feeling that trimming feet is a pleasant activity. Any bad note -- you yelled at him or slapped him -- gives him an overall impression that trimming is unpleasant, and he will be less cooperative next time. It is your responsibility to watch your own level of frustration.
It is OK to give a horse hay to munch on while trimming. Put it up on a bale or a cart so he can stay balanced. Young horses can be more patient if they have some hay.
Trimming a hard, dry hoof is nearly impossible. If the horse's feet are hard, soak them for 15-20 minutes in water or mud. Soak again if they dry out. Standing on bedding while you trim will dry them out totally in about 5 minutes. In dry weather, make up a spray bottle with about 1/4 cider vinegar, 3/4 water, and spray the hoof frequently. If you live in the desert and soaking doesn't soften the feet enough, consider using a Dremel tool (see Tools page).
Work in a place where you and the horse can be weather-comfortable (for summer: shade and fly spray; for winter, protection from the wind) and where the horse can be socially comfortable (horse friends close by). These two things will make a big difference in how easy it is to do the work.
Trimming isn't a marathon, it's a wonderful, intimate part of your relationship with your horse. Give yourself lots of little stand-up breaks, drink plenty of water, and take the horse for a short walk occasionally. Work on a different foot frequently -- it's good to do each step of the trim on the left and right foot so he can shift his weight. Tell him how dear he is. All these things will help both of you to stay focused.
If you want "before" photos, now is the time to take them. Do each foot in order, hooves can look the same when you get all the pictures back! Remember the camera's depth-of-field is very shallow at close range (getting too close will give you a fuzzy picture).
-
-- Side view, camera on your hand on the ground
-- Front view, camera on your hand on the ground
-- Sole view, someone holding hoof up
-- Side view of hoof, someone holding hoof up
-- Back view showing bulbs and heel height
-- Front view of front legs
-- Back view of hind legs
-- Side view of whole horse (this will show how his posture changes as the feet get more balanced).
If your horse doesn't like to hold up his feet for you, prepare him for about a week ahead of time by doing some TTEAM circles www.lindatellingtonjones.com with his legs every day, like this:
Stand in a secure, karate-type stance (knees bent, relaxed). With one hand supporting the leg and the other guiding the hoof, pick up a leg as high as the horse needs in order to relax. Set your elbows firmly on your thighs and slowly make tiny circles (the size of a quarter or even a dime) of the whole leg by making a circle with your knees, 3 circles in one direction and 3 in the other direction. A round circle is more important than a big circle. Then set the foot down onto the toe, and go to the next foot.
Horses love this when they catch on. They figure out how to relax all the muscles around the hip and shoulder joints, and will eventually let you circle the foot right down near the ground, overcoming the "put the foot down" reflex. Within a few days your horse will be picking up the next foot and asking for it to be "circled."
If the horse gets tense during the trimming, TTEAM circles are a good way to help him relax.
Set-up: It is easiest for the horse to hold up a foot for you when the diagonal foot is farthest away; that gives him the best 3-legged position. Most horses will catch on quickly if you consistently ask for this position. Often just the set-up is enough that he will offer you his foot. Be ready to receive it!
Do not take a foot that isn't offered. If you try to pick up a horse's foot with your own strength, he will get "heavier" over time, not lighter.
Your horse will get very light in picking up his feet if you always ask with a small signal first, followed by a bigger signal. If you are consistent, he will soon pick up the foot on the first (lightest) signal. Be right there to receive it -- it's impolite to ask and not be ready.
For example, as I bend down to the foot, I run my hand lightly down the leg (first signal). When my hand gets to the fetlock, I chuck my fingernails lightly upward against the hair there (second signal). If no response, I take whatever tool I have in my other hand, and knock it rhythmically against the fetlock bone, hard enough that I can hear it (third signal), continuing until hoof gets picked up; then stop instantly and receive the foot. The knocking is NOT to cause pain, only to bother the horse enough that he would rather pick it up.
If the horse is "stubborn" about picking up one foot, it often means the other foot is too sore to stand on. Go to that foot and do whatever will make it immediately more comfortable. Often it's bars that touch the ground, or a flare that's pulling on the white line.
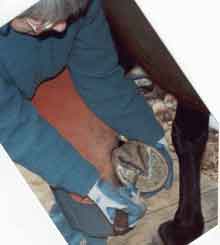
Here is a way to hold the front foot. Whenever possible, brace the foot against your thigh. Stand so that your thigh or knee is right in against the pastern, to keep the foot from wobbling around loose in the air.
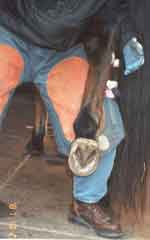
Here is how you hold a hind leg. Put your thigh right under the cannon bone. Your foot should be well under the horse, almost beside his other foot (you can see it beside my boot-laces). In this position he can't pull his leg forward to get away from you.
To work on the inside half of a front or hind foot, a good position is to kneel with one knee on the ground, the other up like a little table, and set the foot right on it. At first the horse will pull his foot away, but if you keep asking politely they learn to let it rest there.
Some people like to sit on an auto mechanic's stool with the little wheels, or a milk crate. It helps if you have back trouble. I like to stand up because there is more room for my arms and elbows to move.
If you are strong enough you can use the farrier's position, clamping the hoof between your knees (point your toes in for a better grip.) This gives you two hands to work with.
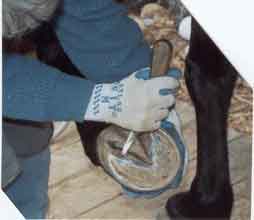
Sharpen your knife (see Tools page) and put your gloves on!
Clear out dirt and gravel with the hoofpick, especially in the white line and the corner of the heel. A grain of sand will put a nick in your knifeblade; gravel dulls your rasp.
Using the hoof knife: Hold it in a fist grip, with the blade coming out on the little-finger side. The hoof knife is different from kitchen knives and doesn't work well if you hold it with the blade coming out the thumb side.
The near end of the blade is not sharp, so you can "choke down" till the edge of your palm rests on the blade; this gives you more power and control over the tip of the knife, where you do most of your work.
Turn the blade toward you (palm up) for a stroke toward you, or away from you (palm down, and turn the knife over) for a stroke away from you. Use a whole-arm stroke, from the elbow, with your wrist straight.
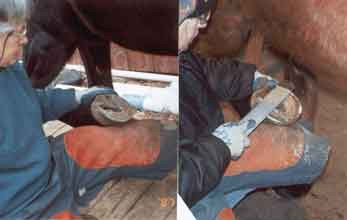
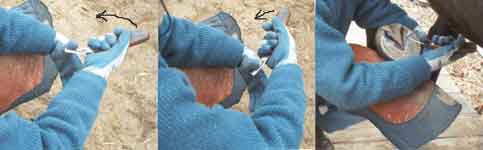
Here I am trimming one side of the frog with a whole-arm stroke down the side of the frog.
Another strong stroke uses your other thumb for a pivot. Set the back of the blade against the other thumb, and PUSH on the handle so the tip of the blade pivots forward around the thumb (see curved arrow). This is useful where you don't have room for a pulling stroke. It gives you a lot of strength and control with the blade.
On the right, I'm using the pivot stroke to trim the bars.
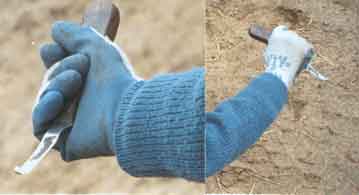
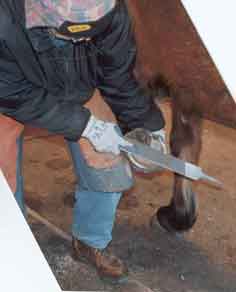
Using the rasp: I prefer not to use a handle on my rasp. It gets you too far away from where the work is happening, and you lose control. I hold onto the rasp itself; gloves are a must. Stronger women and men may prefer a handle.
At first, the priority is to teach your hand and arm to move with an exactly flat stroke. Any curving, bending, or rolling of the rasp stroke will make a hoof base that is not flat. Go slow, think about making the bottom of the hoof totally flat; and add speed later.
With gloves on, hold the rasp by the blade. Hold the pointed end when you want to push down, away from you; hold the round end when you want to pull upwards, toward you.
To trim the heels, it works best to hold the round end and pull upwards (toward yourself) across the "grain" (direction of growth) of the hoof wall, which slants forward. Do a little on one heel, a little on the other, and check their length frequently. Beware: If you rasp across both heels at the same time, you will make them uneven, because your arm stroke won't be even. I promise!
With your stroke, follow the direction of the valley on either side of the frog. Hold the rasp with your right hand for the right heel, left hand for the left heel. It's worth teaching your (left) hand to do this. At first, your stroke can be short; the priority is that your arm learns the motion. Then you can work on strength of the stroke.
For the front half of the hoof, hold the pointed end of the rasp and push away from you, in a bigger motion that can have some sideways drift in it (but still no curve or bend).