
A Wild-horse trim
Please take a good look at the wild horse hooves on the Hoof Shape page. There are also some wild horse hooves on Tribe Equus www.tribeequus.com. Wild hooves are quite different from what we are used to seeing around us; spend some time with them to educate your eye.
In trimming the hooves of domestic horses, we are aiming to approach the shape of wild-horse hooves, with two qualifications:
1) hooves that go 10 to 20 miles (15 to 30 km) -- as the wild horses do -- daily on hard ground will look better, and be shorter (higher position of the coffin bone inside the hoof capsule), than hooves that don't go so far, or that work mostly on soft footing;
2) wild hooves living on flat prairie would look different from the wild hooves on Hoof Shape page, that lived on dry, rocky mountainsides.
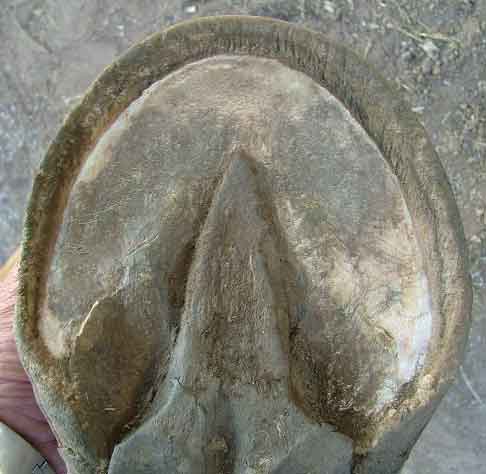
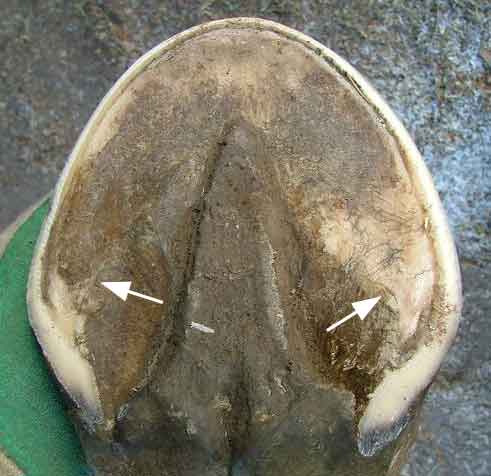
Names of parts of the hoof:
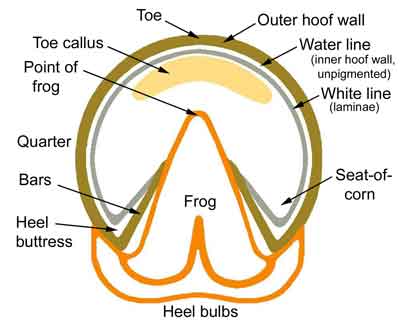
This is a front foot. The hind foot is less symmetrical, narrower, somewhat pointed in the toe; and the sole is more concave than a front foot.
Notice how big the frog is, as a part of the foot. The frog has the
same function as the big pad at the back of a dog's foot. The horse foot should land on the
heel (not the toe) and the frog cushions the concussion.
How to trim: Front feet (see below for hind feet)
www.ironfreehoof.com by Paige Poss is an excellent companion site to this one. Please use it.
Paige gives her thought process about each foot in her examples, to help you understand what she did and why.
Paige begins her trim "on top" instead of "underneath" as I show here. Either way is workable, depending on your preference or the condition of the foot you are trimming. The trim will turn out the same in the end, whichever way you begin.
Farther down this page I have put a photo series, showing most of this trim.
The trim I will show here is for a horse that is going barefoot for the first time. It will be useful for about the first year, and some horses may need it a lot longer, especially if they live on soft ground (wet climate) or where grass-laminitis is an ongoing or occasional problem.
IF YOU ARE JUST PULLING THE SHOES OFF A HORSE it is a good idea to give the sole and frog a couple of weeks to adjust to being barefoot before you begin a rehabilitative trim. Just shorten overgrown walls and heels to perhaps 1/4 inch (1/2 cm.) longer than the sole, shorten the bars so they are not in contact with the ground, and slightly round off the sharp edge of the wall to prevent chipping and flaring.
If someone is doing the trim for you, and must begin the rehabilitative trim today due to infrequent visits, you can make temporary "moccasins" for your horse to wear for two or three days, if the horse seems sore after the trim. Cut two layers from an old inner tube and tape on with lots of duct tape. A heavy horse might need three layers.
Another good padding is the half-inch (about 1 cm) closed cell foam used by people who stand on concrete floors in their job; available at construction supply stores. Mouse-pad material is not firm enough to protect the sole from bruising -- a horse's weight crushes it to nothing.
Horses that have completed transition, or that were never shod, will not need the rehabilitative parts of this trim and can go directly to a maintenance trim (see below).
This is a "white line strategy" trim.
1) Prepare the hoof:
Clean out the bottom of the hoof so you can see it clearly. Be sure to get sand and grit out of the white line and the back corners of the sole. Grains of sand will dull your tools.
If the tip of the frog has grown forward across the sole, trim it back, with a sharp hoof knife, until you can see where the frog actually meets the sole -- you can see the different colors of the frog and sole materials. If the frog is overgrown enough to lean over to one side, trim off the leaned-over part.
In the back 1/3 of the frog, if there is fungus (peeling layers, holes, and/or black stuff), trim away the layers of fungus-y frog until you get to the bottom of the blackened parts. You need a sharp hoof knife to do this, otherwise you can slip and hurt the horse. The fungus-y tissue -- which is a lighter gray color than healthy tissue -- is dead and the horses don't seem to feel a deep knife stroke, if you're careful.
Especially in wet climate hooves, the frog helps to support the foot, and should not be shortened unless it is more than 1/8 inch (3 mm.) longer than the heels. The back of the frog has important sensors that tell the horse when the hoof has touched the ground. A slightly long frog will squash down within several days after the "first trim." A very few horses (such as some Haflingers) tend to grow so much frog that the frog corium gets bruised, making them very heel-sore -- it's OK to trim the frog down close to the level of the heels, on these few horses.
In a newly de-shod hoof that is very overgrown, if there is a lot of chalky or crackled exfoliating sole so that you cannot easily see how far to trim the walls, you can scrape it out with a hoofpick or the hook-end of your hoof knife, until you find the "hard" or "live" sole, which feels harder, looks waxy, and has more color. Generally, the barefoot sole will exfoliate (wear off) naturally if the horse lives outdoors or is ridden daily on rough ground.
The most important place to scrape out chalk is the back corners of the sole (seat-of-corn), because the sole there is your guide for trimming the heel length. If the heels are very long or underslung, you can trim away the excess bars with your hoof knife, so you have room to scrape way back into the corner.
If there is no chalky layer, leave the hard sole alone! The
sole in a horse that gets enough movement is extremely hard and protects
the foot from rocks.
2) Back up the toe.
Most hooves that have been shod, or have had a "pasture trim," are too short at the toe (the toe sole has been thinned). However, the toe is often flared forward and needs to be "backed up" (trimmed back toward the rest of the foot).
The wild-horse barefoot trim avoids shortening the toe underneath and thinning the sole. Instead we allow the sole to grow thicker (toe callus), and the toe wall to grow longer to match the thicker sole. This helps to increase the concavity of the foot. We use the mustang roll, or sometimes a vertical cut, to back up a forward flared toe.
Working on the bottom of the foot, use the rasp at about 45 degrees to the bottom. This step trims the wall to the correct length, and at the same time begins the "mustang roll." Or, you can use a vertical cut -- vertical to the ground -- if you prefer.
On a "first barefoot trim," using either a 45 or a vertical cut, rasp through
the entire wall, including the "water line" which looks white, and end the cut
at the outer edge of the white line (yellowish or black with dirt).
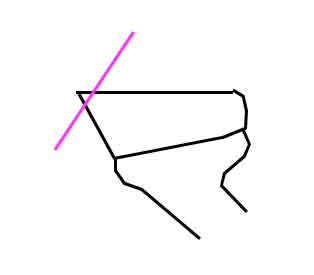 |
Here is the upside-down hoof you are holding in one hand against
your leg, or between your knees. The pink line shows about how steep your
rasp cut should be. In a foot that is not flared, you will rasp only to the outer edge of
the "white line." Where the toe has flared forward, or where the quarters are flared, you
will continue to the edge of the sole.
NOTE: the "white line" is actually a yellowish color (or can be black with dirt if it is separated) when you rasp across it. The layer that looks white is called the "water line" and is the unpigmented inside layer of the wall. |
-- Where the white line is stretched (it's black with dirt, or is wide, or makes a little ditch between the sole and wall) continue through the white line to the edge of the sole.-- Where the white line is not stretched (it's narrow, clean, and yellowish) stop at the outer edge of the white line.
-- Make this 45 degree cut around the entire toe and along the quarters, to a little beyond the widest part of the hoof. Continue gently with a more vertical cut, all the way along the outside of the heel.
You can work on a hoof stand, or with the hoof resting on your bent knee as if on a hoofstand; or kneel with the foot on very soft ground that you can rasp into. Round off the sharp corner where your 45 degree cut meets the outer surface of the wall. This completes the "mustang roll."
If there is a toe flare that extends high up on the wall, do not rasp off the upper part of the flare as this can weaken the wall. We have had horses quickly go flat-soled (lose concavity) after doing this. Just keep renewing the mustang roll as the flare grows down, so that the wall is not directly on the ground.
A flare or chipping at the quarters is usually due to the wall being too long there. Make sure you trim the quarters to the level of the sole, which often has a slight "arch" like the human foot, to help with flexion. Use a strong mustang roll (e.g. to the edge of the sole) if the white line is separated along the quarters.
4) Trim the heels.
Dr. Robert Bowker has discovered that the digital cushion -- a fatty area above the frog -- loses its toughness and cushioning quality while a hoof is shod. It will start to get tougher when the foot lands heel-first (see Breakover page), BUT the newly-barefoot heel must be left slightly long for protection, otherwise the horse will purposely land toe-first to protect the tender heel. This is also true of horses with frog infections.
Therefore, Pete Ramey suggests that the heels in a transitioning horse should be left 1/8 to as much as 1/4 inch (3 to 6 mm) longer than the sole. Exactly how long, you will have to discover, based on what length makes the horse willing to land heel-first on hard ground.
Maureen Tierney www.barefoottrimming.com has noted that if she backs up the toes and lets the heels grow as much as they want, they will tend to begin self-trimming at about 1/4 to 3/8 inch (6 to 10 mm) above the sole, if the horse has enough outdoor movement time. These longer, self-trimmed heels seem to make many horses more comfortable and able to land heel-first. Maureen lives in the wet-climate eastern USA; horses in dry terrain may wear their heels shorter.
Working on the bottom of the foot, shorten the heels to about 1/4 inch (6 mm) longer than the hard sole in the seat-of-corn. Do not try to rasp both heels at the same time, it's hard to get them level that way. Trim one heel, then the other to match it.Sight across the heels towards the toe to make sure the heels are the same height. Tip the foot so that the heels are in line with the toe -- like looking across a drinking glass, held so the near and far sides of the rim match. If one heel is longer, it will stick up slightly above the toe.
NOTE: If the heels are contracted, DO NOT try to force them apart with heel-trimming methods (e.g. "opening cuts," " cutting out the bars," or sloping the surface of the heel inwards). These methods DO NOT WORK and can damage the heel structure.
The cause of contracted heels is a forward-flared toe, which pulls the entire hoof capsule forward, including the heels, and pulls the heels together. Heels will spread apart after just a few trims, if you keep the toe backed up, and treat the frog for fungus if it is infected (see More Topics page).
5) Trim the bars.
If you shortened the heels enough so that part of the bars is now flat on the ground (level with the outer wall), trim off the flat part, with a hoof knife, till it's a little shorter than the heel and outer wall.
Looking now at the entire bar:
-- If the bar is somewhat long so that there is a thin dirt line between bar and sole, trim the bar, starting along its outer edge, until there is no more dirt line.On a hoof with too little concavity or a thin sole, there is often a ridge of raised sole (sometimes called "bar pools") that looks like a continuation of the bars, beside or extending around the front of the frog. DO NOT trim this away -- the hoof needs it for support. Later, when the foot gains concavity, it will go away by itself.-- Once you have trimmed the bars back to their normal height at the level of the sole, you may not have to trim them very often. Horses that live outdoors or get plenty of movement will wear the bars to a nice sharp edge which gives traction on soft ground. After the "first barefoot trim" you should rarely need to trim the bars.
-- If you are doing a "first trim" after the horse has been shod or neglected, and the bars have overgrown a lot to make a layer across the sole, there are two possible things to do.
(Keep in mind that bars do not grow exactly upright, they grow at a slight slant so that they can flex as the hoof lands heel-first. A slanted bar is not "laid-over" unless it has also grown over part of the sole.)
1) (The "obvious" method) Use the hook-end of your hoof knife to shave off the farthest edge of the bar, a little at a time, until it is no longer covering the sole. Do your best not to cut any hard sole as you trim back the bar. Stop when there is no more dirt line between the bar and the sole.
The difficulty with trimming this way is that often the bars have overgrown "on purpose" to protect a sole that has been trimmed and is too thin. If so, you will find that the bars "overgrow" again very quickly to protect the sole. The horse may be quite sore after the trim and need temporary pads for a few days, and should wear hoof boots for trail riding.
2) (The "less-obvious" but probably better method) Leave the overgrown bars as they are. The only trimming you will do at the first trim is to back up a forward-flared toe and wall flares, and level and perhaps shorten the heels. If the bars have overgrown to help protect a thin sole, they will often flake away by themselves as soon as the sole has grown thick enough. Pete Ramey reports that this takes about a month, and that horses are not sole-sore in the meantime.
Curved bars (due to contracted or underslung heels) can NOT be straightened by over-shortening the bars or making an "opening cut" in the heels. They will straighten as the foot re-shapes itself when you back up the forward-flared toe.
However, if you live in a wet climate and there is a fungus infection in the frog, you do need to treat the fungus so the frog can grow. A wide, healthy frog helps to push contracted heels apart and allows the bars to straighten.
Maintenance trim:
Front feet regain concavity, almost overnight, when the forward-flared toe wall has grown straight, with a tight laminar connection, from the coronet to the ground. When the hoof becomes concave (about 1/2 to 3/4 inch [10-18 mm] deep at the point of frog) and the horse is able to go on gravel with no soreness, you can shift to a maintenance trim.
Horses that live on lush grass, Cushings horses, or insulin-resistant horses may always need the strong mustang roll (white line strategy trim) described above. And they may always need boots for trail riding.
-- Mustang roll (or vertical cut) to the middle of the water line -- see photos of mustang feet on Hoof Shape page.
-- Trim the heels to the horse's preferred height. This may vary with wet/dry seasons, terrain, condition of the frog, and changes in work. Be ready to let heels be "too long" if the horse shows any heel discomfort such as toe-first landing.
-- Bars generally will not need trimming if the horse gets enough movement to wear them.
-- Frog should only be trimmed if it gets long enough to lean over to one side. Only remove the leaned-over part. (Diseased frog should be trimmed away to let air get to the bottom of the infection.)
-- Watch for flaring, especially during your lush-grass season(s) when grass laminitis can weaken the white line -- and IMMEDIATELY return to the "white line strategy."
Hind feet
The hind feet are trimmed the same way as the front feet. Hind feet get a mustang roll, too.
If a hind foot has worn too short in the heels and the toe has gotten "long out in front," back up the toe to the edge of the sole. You can stop backing up the toe when the toe / heel proportion (from a line drawn across the widest part of the hoof) comes back to 1/2 - 1/2 and the bulbs are no longer squashed flat.
Looking at the sole, hind feet are generally not symmetrical in their medial-lateral (inside-outside) outline. The outside half is generally wider, due to different forces in the way the hind leg moves. Do not try to make them symmetrical! The toe is more pointed than a front toe.
The hind feet often grow longer on the inside (medial) because domestic horses with nowhere interesting to go often stand around with one hind leg cocked; the other leg centers under the hindquarters so that the hoof wears more along the outside. The imbalanced hoof makes the hocks wobble sideways (seen by walking behind the horse) and there will be a very sore acupressure point on the rump that shortens the stride. Every time you trim, look for and trim the excess growth along the inside of the hind feet; often the outside doesn't need trimming at all.
A "paddock paradise" walking track will help the horses to wear their hind feet level. See Jamie Jackson's book on Homepage.
Trimming for imbalances
Once a foot is consistently landing heel-first, with the walls trimmed to the level of the sole, even a very imbalanced foot should re-shape itself gradually towards side-to-side balance. In Gene Ovnicek's opinion, we should let the foot change in its own way and at its own speed -- especially a very imbalanced foot, because the imbalance can be due to the coffin bone sitting unevenly inside the hoof capsule, or even taking on an uneven shape. I have several coffin bones like this, they must have been shod crooked for a long time and the bone adapted to the imbalanced trim.
However, this doesn't mean we can be sloppy in our trimming. A "high spot" of as little as 1/16 inch (1 or 2 mm.) somewhere on the wall can make a horse very uncomfortable in his joints and can make him toe-out or toe-in. Finding and trimming a high spot will immediately make the horse more comfortable and you should be able to see the difference in his legs. A leg with a completely balanced foot looks "like a tree growing out of the ground" -- straight and vertical.
The heel-first landing (see Breakover page) is the best way to help the coffin bone re-shape itself. When the foot lands on the heel, flexion and circulation work the best and the hoof is capable of amazing changes and self-rehabilitation.
Toes
Because the hoof is not a square vertical object but grows forward at a slant, there are two directions that we can trim the toe, so we need two ways to talk about it.
A long toe means that, looking at the bottom of the hoof, the wall has grown beyond the sole. To shorten the toe means to cut the excess wall length on the bottom, until it is level with the sole. Long toes are uncommon because farriers tend to shorten toes into the toe callus.
A forward flared toe has a weakened white line (laminar) connection to the coffin (pedal) bone and sticks out too far in front, causing a late breakover. It may or may not be longer than the sole; farriers often shorten the toe underneath and cut the toe callus away, while leaving the toe flare, so that the coffin (pedal) bone has very little sole protection.
With late breakover of the front feet, there may be forging (hind foot hits front foot because front foot cannot get out of the way soon enough) and/or a shortened stride. And, crucial to soundness, you will see the foot landing toe-first or flat, rather than the correct heel-first landing (See Breakover page).
To back up a forward-flared toe means to cut the excess forward-flared wall, with either a vertical cut or a mustang roll (rounded bevel), to a position where the horse can break over correctly. The vertical cut, or the curve of the mustang roll, should go all the way to the edge of the sole, which in a forward flared foot has grown forward past its correct position.
We trim forward-flared toes this way until the wall has grown down with a new, tight, white line (laminar) connection all the way from the coronet to the ground, which may take several months to a year. After a forward-flared toe has grown down unflared, you can change to a regular mustang roll which ends at the center of the "water line," the layer of white, unpigmented wall between the outer wall and the "white line" which actually looks yellowish in color.
The toes on the hind feet are very
important to the horse's movement. Hind feet almost always land
heel-first, due to the zig-zag arrangement of the hind leg joints.
However, forward-flared hind toes cause a late breakover of the hind
legs. The horse cannot move in collection because there is not enough
time for the hind legs to reach all the way forward.
For the horse to
carry the rider's weight effectively, the hind toes should be backed up
to the white line (yellowish color), especially in a horse whose heels
tend to run under and toes tend to grow forward. Long-backed horses will also need an early breakover so that they can reach the hind feet well forward under their weight.
Cracks
The two most common wall cracks are toe cracks and quarter cracks.
A toe crack is usually at or near the
center line of the toe. It is caused by "corners" or "bulges" in the
outline of the toe, at about 2 o'clock and 10 o'clock from the center.
The mechanical force of the ground pushing against these corners, pulls
the tubules (hair-like material that is the wall is made of) apart, resulting in a crack.
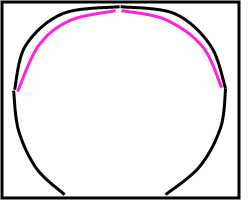
To stop a toe crack, you need to trim the outline or footprint of the hoof to an even, round curve so that there are no "corners" sticking out for the ground to push on. With your eye just in front of the shoulder, look down on the hoof. The outline of the foot should be as round as the coronet. DO NOT try to fix the crack by flattening the wall at the crack. This only makes the "corners" more prominent.
A quarter crack is caused by mechanical stresses in a contracted heel. Normally, the wall at the heels slopes outward like the rest of the wall. The wall of a contracted heel slopes inward. Where the wall changes from an outward slope to an inward slope, the tubules are under great strain and will pull apart, resulting in a crack.
Contracted heels most often occur on a foot with a forward-flared toe. To stop a quarter crack, you need to de-contract the heels. The most effective ways to do this are:
-
1) Back up the forward-flared toe, as
described above
2) If there is a fungus infection, treat the fungus (see More Topics page). As the frog grows wider it will push the heels farther apart.
How often do you need to trim?
The answer to this question will vary widely, because horses in different situations wear their feet differently. See also the "Schedule" page on www.ironfreehoof.com.
On one end of the scale, I have heard of horses that live on many acres of dry, partly rocky ground, and go for long trail rides several times a week, that need a trim maybe once a year.
On the other end of the scale, my insulin resistant horse lived in a 1/4 acre paddock and never got enough work to wear her feet much. I had to trim at two weeks most of the year, three weeks in the winter when they grew slower. When I let her feet go an extra week, they started to flare.
A transitioning hoof needs to be trimmed when the toe wall has grown to the level of the sole, to prevent flaring of the still-weak white line. A horse that has regained concavity and is getting a maintenance trim can probably be left till the toe wall is 1/8 inch (3mm) longer than the sole.
Some horses wear the toe enough that it rarely needs a trim; in that case, trim when the quarters need it, to prevent flares and cracks from developing there.
If the wall keeps flaring, trim more frequently and consider the grass issue (insulin resistance). A horse will not go "sound on gravel" until the white line is completely tight. In the UK and eastern US, grass laminitis is the major concern in trimming your horse. See www.safergrass.org
Photos of a "white line strategy" trim
Johan de Kock of South Africa sent this nice series of photos, showing how to trim when the white line is stretched (= when there is a flare). Most of the comments are Johan's; I have edited them in places for clarity.
When the wall is flared and the white line is stretched (those are the same thing), the coffin bone is not firmly attached inside the hoof capsule, and settles down onto the sole corium, causing "transition" soreness. This shows up most often as the horse going "sore on gravel."
The "white line strategy" that Pete Ramey figured out, which I have outlined above and which Johan shows here, gives the wall a chance to grow a new, tight laminar (white line) connection so that the coffin bone will become firmly attached inside the hoof capsule. When this is accomplished, the horse will be able to walk on gravel without pain, and may no longer need boots while riding -- depending on climate and terrain.
In areas with a wet climate or wet season,
where the ground is soft and damp, the water-softened walls flare very
easily and it is a constant struggle to keep them from flaring. Even a
few days of extra growth can be enough to cause new flares -- and the loss
of several weeks' work. You will have to discover for yourself, when to
trim again to prevent this re-flaring. Horses in wet climates may need
to ride with boots nearly all the time if they live on pasture but are
ridden on gravel roads or rocky trails.
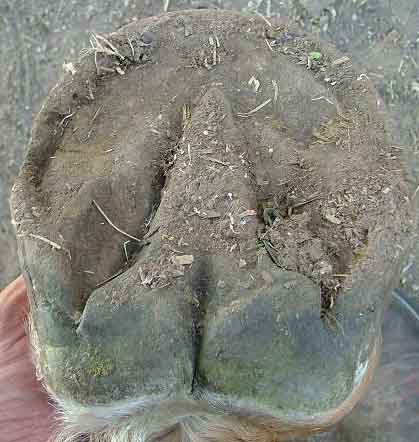 |
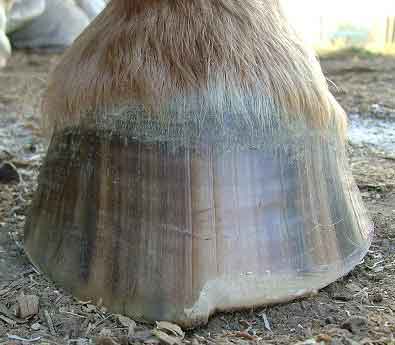
The photos are mostly of Dane's Left Fore, to show you what flare
looks like AND what tighter laminae (white line) looks like.
This is the hoof untouched, I just picked it up and took the picture. |
 |
Next I have picked the hoof and cleaned it with a wire brush. Can you see how stretched the white line is? [It makes a ditch or furrow just outside the sole. You can see the laminae on the inside of the wall - M.] Can you also see that there is "dead" (chalky, crackly) sole in the seat-of-corn? [On the left side, the heel is filled-in with some "dead" sole which must be scraped out to find the true level of the sole, to guide us in trimming the length of the heel on that side. Note that the heel at the left is farther forward than the right -- a good clue that the left heel is longer - M.] |
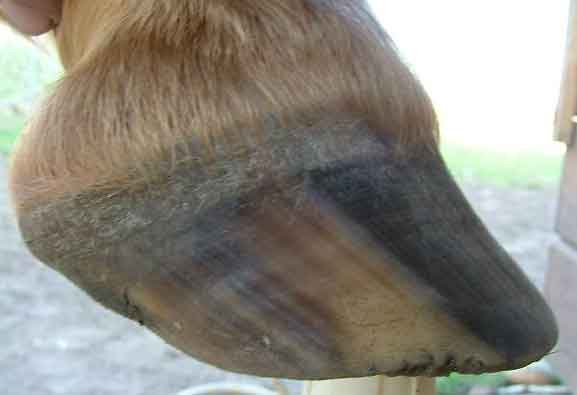 |
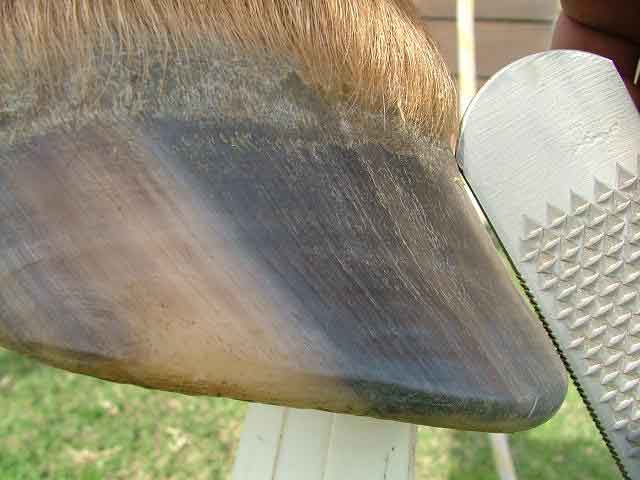
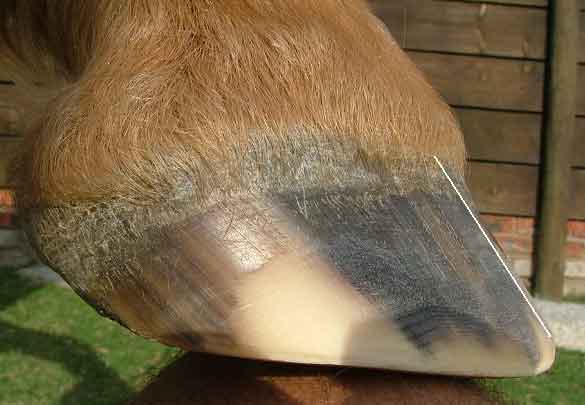
Here is the side view of the Right Fore [this photo was clearer
than the Left].
Can you see where the top part of the wall is tightly attached to the coffin bone. The flare begins about halfway down the toe; from here to the ground, the white line is stretched. |
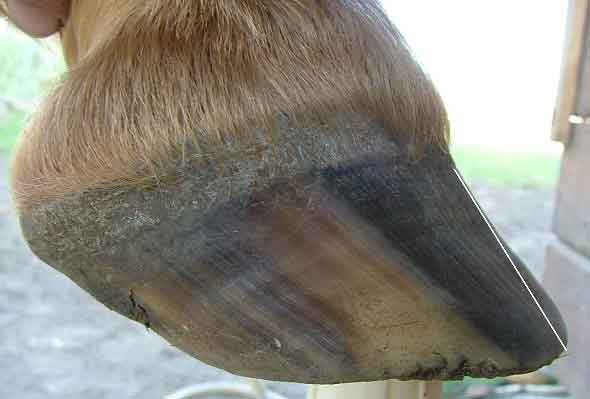 |
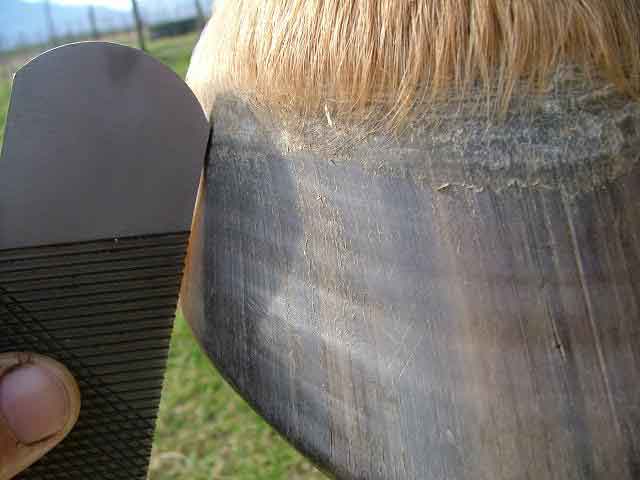
If I now draw a line [on the photo] following the upper part
of the toe wall, all the way to the ground, it will indicate to me how
much flare there is.
I have drawn the line just inside the edge of the hoofwall so that you can see where the laminae are tight, and where the flare begins. Dane grows more well-connected wall every time there is new growth. The old, flared growth keeps growing down towards the ground. However, flare is still flare and the flared area must be backed-up. [Notice the overgrown heel. A horse's heel grows forward as it grows longer -- hooves don't grow straight down! This is not an "underslung" heel because, looking at the sole view, the heel is not contracted - M.] |
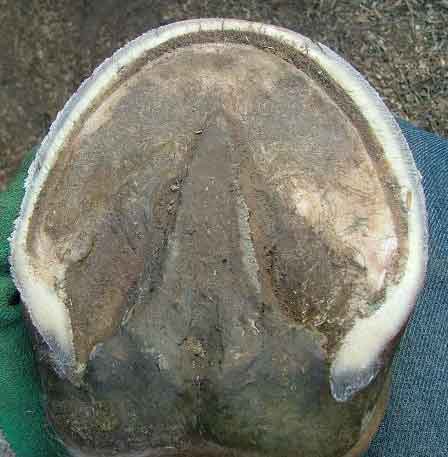 |
I have trimmed the wall flat, all the way around, to sole level.
When I touch the edge of the sole, I stop. Notice how far back the heel
buttresses have moved.
[The "white line" shows clearly here as a thick, dirty line. The part that looks white is the "water line" or un-pigmented inner layer of hoof wall - M.] [Using the trim shown above, we would not trim the wall flat and
would not touch even the edge of the sole with the rasp. Johan has done
this to show the stretched white line. We also would not trim the heels
to the level of the sole until the foot had regained concavity - M.]
|
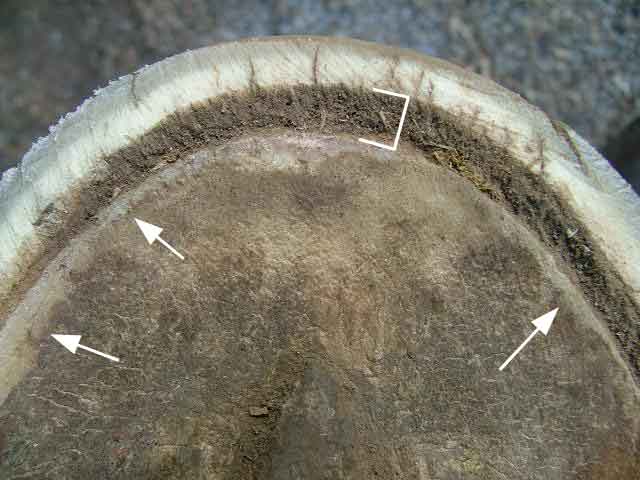 |
Look at how stretched the white line is, especially around the toe.
[Bracket shows the width of the stretched white line. Arrows point to where Johan's rasp, shortening the wall, has barely touched the edge of the sole. - M.] |
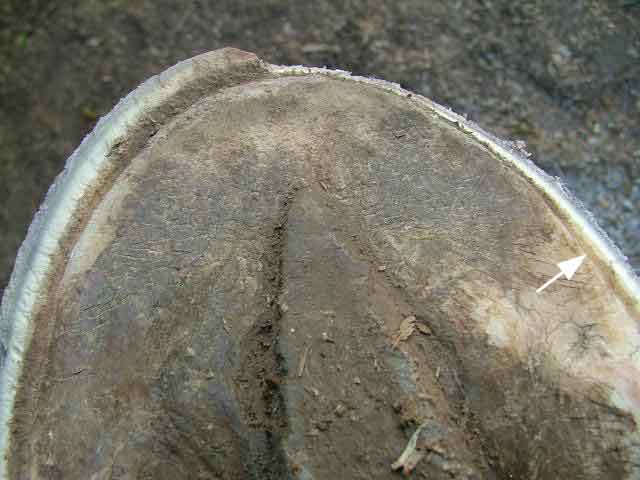 |
To show the mustang roll, I will do half the hoof, so you can see
the difference. Where the white line is stretched, I rasp at about 45 degrees
to the sole, going all the way to the edge of the sole.
[Arrow points to part of the white line which is not stretched. Notice it is clean and has a yellowish color - M.] |
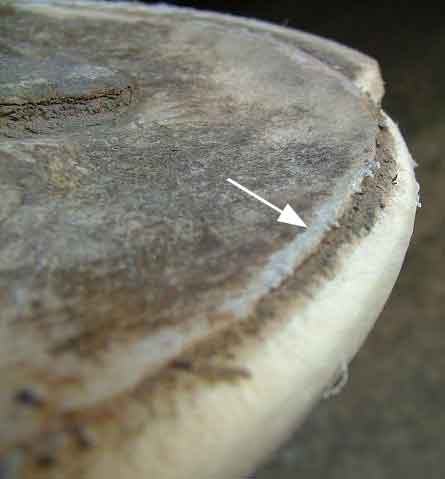 |
Maybe this picture will give you a better idea as to how I have removed the wall and white line right up to the sole. [Arrow points to edge of the sole - M.] |
 |
Here is the trimmed side, with the mustang roll done.
[I drew a white line, following the upper part of the hoof wall, showing where the wall will grow to after the flare is gone. Notice that it meets the present edge of the sole, the same spot where Johan has ended his mustang roll. The green line shows where the lower part of the wall is flared. The pink curve outlines Johan's very nice mustang roll on this half of the foot; the other side has not been beveled yet - M.] |
 |
And just so you can see the difference in length (and to give you
a better idea of how I do the mustang roll), I took this one from the front.
[Both sides are trimmed to the same wall length on the bottom of the foot. The difference that you see is entirely due to beveling the wall with a mustang roll. Does this give you a better idea why an unbeveled wall starts to flare again? - M.] |
 |
After that I did the other half as well. Notice the white line in
the left heel starting to show, that's where I stop trimming the heel.
The quarters are still flared, but I was happy with them like that for
the night, as it was going to be dark soon and I still had to take pictures
and feed pigs :-) I'll finish tomorrow when I work the flares
down from the outside.
[Arrows point to a thin dirt line between the bars and the sole, indicating the bars are a little overgrown. Using a hoof knife, we can trim the bars and the overgrown sole beside them until there is no more dirt line; that is the correct length of the bars - M.] |
 |
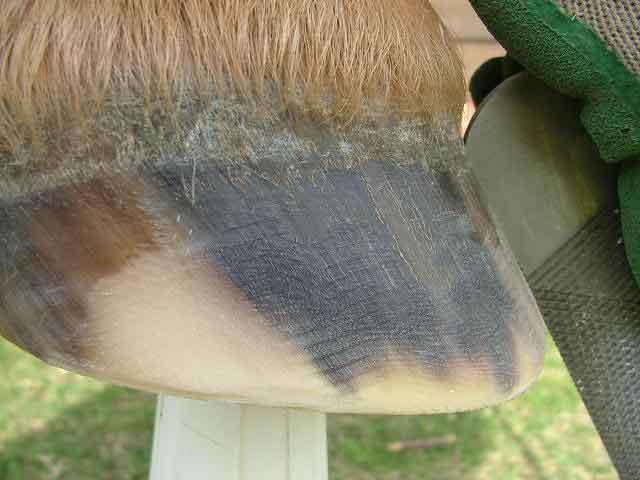
Here it is what it looks like from the outside once the mustang
roll is done.
[White line shows where the side wall will be when the flare has grown out. All the wall outside this line is flared. Pink line shows Johan's vertical cut, removing flare at the bottom of the wall only. Note that the vertical cut meets the ground where the new wall will eventually be. In this way we prevent the wall from contacting the ground, and constantly re-flaring, until the new white line connection has grown down from the coronet all the way to the ground - M.] |
 |
Next day, finishing the flare.
You need a way of checking how much flare there is, how much you have taken off and whether it's correct now. Hold the rasp on its side against the hoofwall, and look if you can see between the rasp and the wall. You can see, here, that the top part is straight and then the bottom bends outwards. That bottom part is flare and IT MUST GO!!! [Note that Dane lives in a very dry climate, and the flare has grown down a lot since he was de-shod. In my wet climate, I would not remove this remaining flare. - M. |
 |
Checking the quarter for flaring, again using the rasp for a straight-edge.
It's a little difficult to hold the foot and the rasp, and take the picture at the same time :-) but you can see the quarter is flared just a little. |
 |
Rasp the outside of the hoof till the flare is gone. Again check
with the rasp, now the flare is gone and the rasp fits right against the
toe wall.
[Note: on a foundered foot with extreme flaring, or a foot living in a wet climate, we would not do this step because we don't want to weaken the wall. We only do the vertical cut shown above. |
 |
On the photo I have marked the dorsal hoofwall (toe wall), drawing
just inside the wall so you can see the straight toe.
[Now the entire toe matches the growth angle of the upper hoofwall below the coronet. The white line (laminae) inside the lower wall is still stretched, the flare is still "in there," but the excess wall has been removed so that the hoof can break over well. Now the wall will not re-flare because there is no ground contact in front of the breakover. Again, a horse in a wet climate can lose its concavity (go flat-soled) if we straighten the flared toe wall like this. - M.] |